QuickBooks users have been facing variegated technical errors lately and these have largely affected the accounting processes across businesses. One peculiar error appears when the user tries to Begin Reconciliation upon choosing an account, but the beginning Balance zero or incorrect error appears. This issue can be ascribed to various reasons, and to curb those contributory causes, this there are different solutions.
This is where the current blog shall come to the rescue. Herein, an in-depth enumeration of different causes shall be done along with potential and workable ways to fix beginning balance issues in QuickBooks Desktop.
Fixing Beginning Balance Issues in QuickBooks Desktop
Fixing this error is possible by implementing the following solutions:
- Correcting zero balance
- Fix incorrect balance
- Limitations while switching from other QB versions.
Lets venture into the details of each of these troubleshooting strategies one by one:
Solution 1: Correcting zero balance
The initial step requires the creation of an opening balance again. Following that, the user needs to go for the reconciliation of this account.
Step 1: Creating Journal entry
The procedure to create Journal entry is:
- First, advance to the Company tab, and from there, choose the option to Make General Journal Entries.
- After that, correct the statement date in the beginning balance.
- Choose the proper account from the account drop-down
- The next step is to go for entering the correct opening balance within the Debit column.
- Then, choose the Opening Balance Equity.
- Finally, hit on the Save tab.
Step 2: Reconciling to rectify the Beginning Balance issue
The walkthrough to correct beginning balance is discussed below:
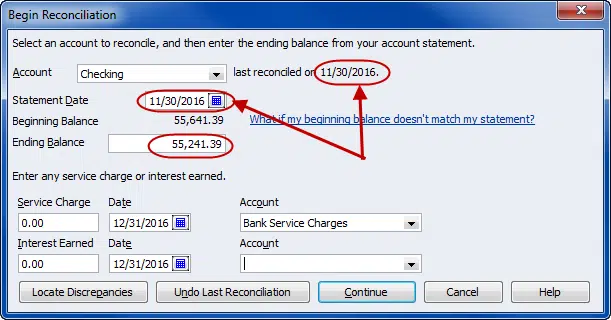
- Pick the Banking menu and go for the Reconcile tab therein.
- Choose the Proper account from the drop-down menu.
- Fill in the statement Date and ending balance that tally with your journal entry.
- Pick the Continue tab.
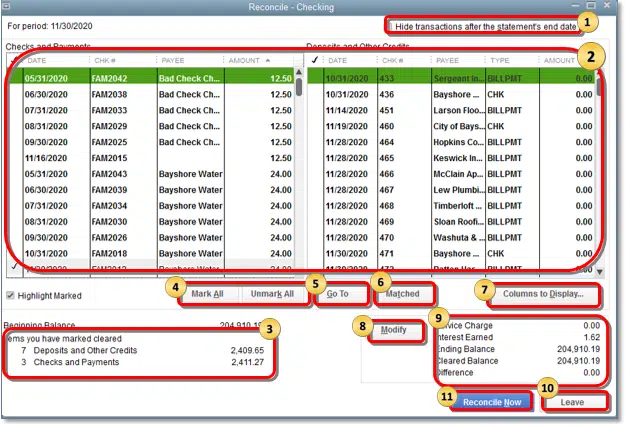
- Now, in the Deposits and other credits section, pick the corresponding journal entry.
- Also, note that the amount shown for the difference should now be zero.
- End the process by selecting Reconcile now tab.
Solution 2: Fix incorrect balance
Step 1: Fixing edited or deleted transactions
Step to run Reconcile Discrepancy report
The procedure for running the Reconcile Discrepancy report is discussed below in detail:
- First, head to Reports, and from there, proceed to the Banking option.
- After that, make a move to the Reconciliation Discrepancy option.
- Herein, opt for the Account. The next step is to hit on Ok. The screen will unravel the transaction list changed from the last reconciliation.
- The user should utilize this Reconcile Discrepancy report for identifying the report that is inciting the beginning balance issues.
- Upon identification of the discrepancy, take a note of the date of the transaction, and also note down the Entered/Last Modified.
Step 2: Run Audit Trail report
The Audit trail report can be run using the following steps:
- Just like in previous case, the user should head to the Reports tab, followed by the Banking tab.
- The next step involves opting for the Previous Reconciliation.
- At this stage, the account to be reconciled should be chosen.
- Opt for the most recent statement date.
- The next step requires opting for the Transactions that are cleared during reconciliation.
- The user needs to take a note of the statement and reconciliation creation date.
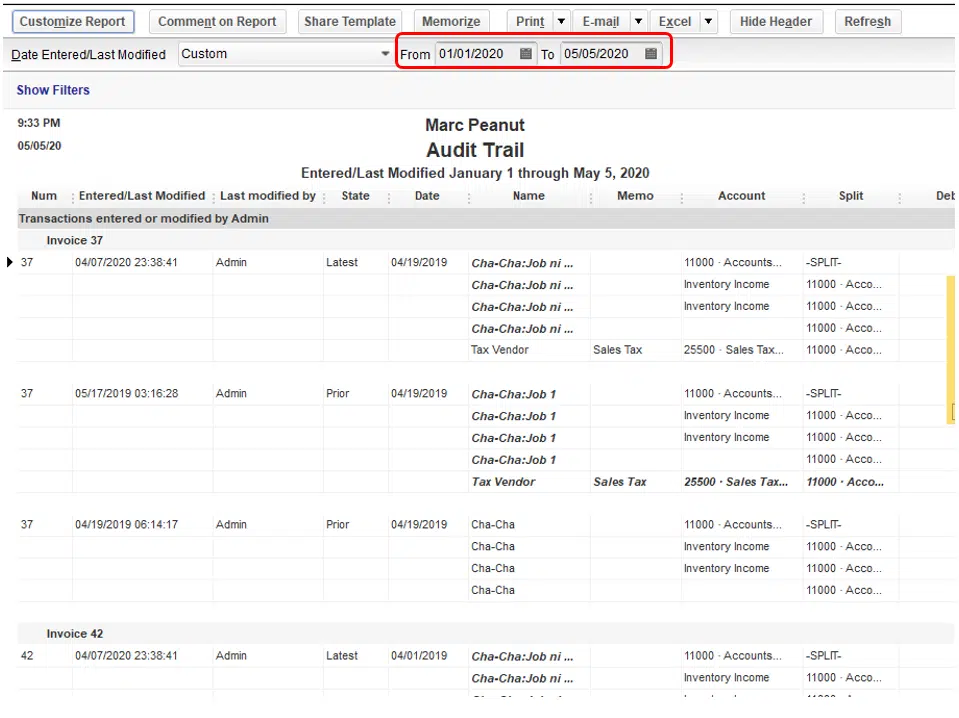
- Make a move to Reports, and from there, head for the Accountant and Taxes option.
- The next step should be visiting the Audit Trail option.
- The user is required to adjust filter corresponding to the account to be reconciled.
- After that, proceed by hitting on the Customize Report option.
- Afterwards, make a move to the Filters, and herein, click on the Account in the filters.
- Opt for the account and then choose Display.
- The user should adjust the Date filter in the From field blank and the To date set to the statement date.
- Once done with that, click on Ok.
- The next step requires choosing the Entered/Modified filter with the From date set to the previous reconciliation creation date, and the To field as today's date.
- The user should now identify any discrepancy in the report.
Step 2: Run the Previous Reconciliation report
QuickBooks Pro users can only get access to the last reconciliation report. The procedure for running this report is:
- Move to the reports menu and pick banking and previous reconciliation.
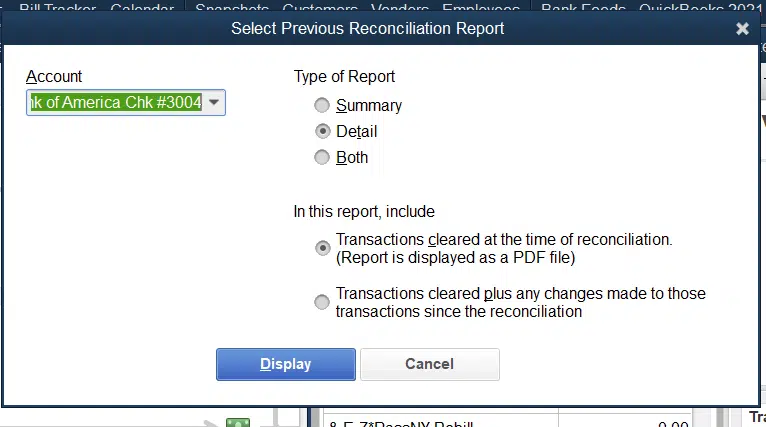
- Choose the appropriate account and statement ending date. Pick display tab.
- And compare this report to past statements from the financial institution.
Step 4: Step to Correct discrepancy
The correction of the discrepancy requires editing or re-entering the transactions. In this context, the user can Undo a previous reconciliation and redo it, or he/she can overlook the discrepancy and allow QuickBooks to enter some offsetting adjustment.
Procedure to Undo a previous reconciliation and redo it
- Towards the beginning, the QB company file backup should be created and saved to prevent any loss of data.
- Once the backup is created, make a move to the Banking tab, and from there, move to the Reconcile tab.
- Herein, opt for the option to Undo Last Reconciliation.
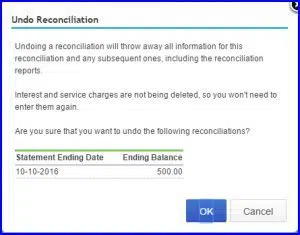
- Afterwards, hit on Continue and follow up by clicking on Ok.
- Now, make an exit from reconcile and then re-open it.
Step 5: Overlook the discrepancy and allow offsetting of the adjustment
The user should avoid the discrepancy and allow QuickBooks to enter the offsetting adjustment. The steps are:
- Hit on Enter Adjustment in pursuit to culminate the reconciliation.
- The Journal entry shall automatically be created under a special expense account. The same can be viewed and edited via the Chart of Accounts tab.
Form locating the Journal Entry, following steps need to be performed:
Making use of the Find feature:
- First, head to the Edit tab. From there, hit on the Find option.
- Now, go for the Advanced tab, and herein, the user needs to make a choice for Memo.
- The next step requires typing the Balance Adjustment, and then hitting on Find. The balance adjustment will be revealed on the screen.
Viewing Previous Reconciliation report:
- The first step requires advancing to Reports, and following that, opt for the Banking tab.
- Now, go to the Previous Reconciliation.
- Just in case a balance adjustment was being done, the user should be able to identify the General Journal Entry within the Transactions that are cleared.
Summing Up!
This article presented three effective solutions that should help users in easily fixing beginning balance issues in QuickBooks Desktop. If you face any technical issues, just give our QuickBooks error support experts at axpertadvisor a call at the helpline 1-800-615-2347.
You may also see: Versions of Windows 10 QuickBooks Desktop?